Managing DNS across multiple providers can easily become a headache. By combining InfraHub and DNSControl, you can finally define your DNS as code, with a single source of truth, peer review, and zero manual syncs.
To bridge these tools, I created infrahub-dnscontrol, a repository providing the schema, Jinja2 templates, and configurations needed to connect them. The workflow is simple: define your DNS data in InfraHub, use Jinja2 transforms to generate DNSControl artifacts, and manage your registrars, zones, and records across platforms, all from that single source of truth.
How it works#
InfraHub acts as your source of truth, storing DNS data in its graph-based model. Jinja2 transformations generate DNSControl configuration artifacts from this data, which you then apply using DNSControl to push changes to your registrars and providers.
%% Workflow: Infrahub → DNSControl via Jinja2 Transforms
flowchart LR
    Infrahub[(Infrahub
Source of Truth)] -->|Schema + Data| Jinja2[Jinja2
Transformations]
    Jinja2 -->|Artifacts| DNSConfig[DNSControl
Config Files]
    DNSConfig -->|dnscontrol.sh| DNSControl[DNSControl
CLI]
    DNSControl -->|Pushes to| Provider1[Bunny DNS]
    DNSControl -->|Pushes to| Provider2[Route53]
    DNSControl -->|Pushes to| Provider3[Hetzner]
Figure: Workflow from Infrahub to DNSControl via Jinja2 transformations
Setting Up the Project#
Before starting, you’ll need a running Infrahub instance. If you don’t have one yet, refer to the Quickstart guide or the installation documentation.
Begin by integrating infrahub-dnscontrol
into your Infrahub instance. This repository provides the DNS schema, transformations, menu
configurations, queries, and artifact definitions required for DNS management.
We use infrahubctl to manage Infrahub resources. If it isn’t installed yet, you’ll need to set
it up first. You have two options:
Option 1: Install directly#
Follow the
official installation guide to
install infrahubctl.
Option 2: Use Mise with mise.toml from the repository (recommended)#
Install Mise for dependency management and clone the repository.
git clone https://codeberg.org/tepene/infrahub-dnscontrol.git
cd infrahub-dnscontrol
mise trust mise.toml
mise install
uv run infrahubctl --install-completion
This approach ensures all required tool versions are configured automatically via the
mise.toml file included in the project. It also makes it easy to manage project-specific
environment variables and keep your local environment consistent across machines.
Managing DNS in Infrahub#
In this chapter, we’ll explore how to manage DNS in Infrahub with infrahub-dnscontrol.
Account Tokens#
API tokens serve as the primary authentication mechanism for Infrahub’s REST and GraphQL APIs,
the Python SDK, and infrahubctl. Since we’ll be using infrahubctl to integrate the
infrahub-dnscontrol repository, you’ll need an API token beforehand. Follow the
official guide
to create one if you haven’t already.
With your API token in hand, you’re ready to configure the environment for infrahubctl.
If you went with the
recommended mise approach,
create a mise.local.toml file in the repository root:
[env]
INFRAHUB_ADDRESS = "http://localhost:8000"
INFRAHUB_API_TOKEN = "your-api-token-here"
Add Repository to Infrahub#
Now that your environment is configured, you’re ready to add the repository to Infrahub:
infrahubctl repository add DNSControl \
  https://codeberg.org/tepene/infrahub-dnscontrol.git \
  --ref main \
  --read-only \
  --description "Infrahub configuration for DNSControl"
This imports the infrahub-dnscontrol repository into Infrahub, including its schema, transformations, menu configurations, and artifact definitions.
You can verify the creation in the Infrahub UI under Integrations / Git Repositories:

Create an Infrahub Branch#
Infrahub branches isolate changes and deployments. Create a branch for your DNSControl configuration:
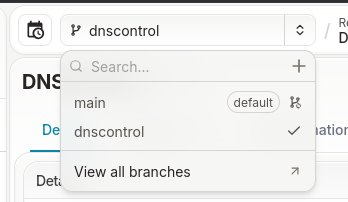
infrahubctl branch create dnscontrolIn the Infrahub UI, you’ll see the new branch listed in the Branch selector. Make sure to select it before proceeding.
Create Registrars and Providers#
DNSControl distinguishes between two provider types: Registrars and Providers. A Registrar is where you buy/manage domains, while a Provider is the service where DNS records are hosted.
Registrar Credentials#
DNSControl uses a creds.json file to store provider credentials. We will use an
Infrahub Transformation to generate this
file dynamically. To enable this, we add only the credential-specific values (not the full
structure) to the Credentials settings, leaving the surrounding JSON structure for the
transformation to assemble.
As an example, I use Porkbun to manage my domain (luescher.io). For
each provider type, DNSControl has a dedicated documentation page with required settings. The
Porkbun configuration reference shows the
expected creds.json structure:
{
  "porkbun": {
    "TYPE": "PORKBUN",
    "api_key": "your-porkbun-api-key",
    "secret_key": "your-porkbun-secret-key"
  }
}
For the Porkbun provider, we need api_key and secret_key values. To create the Registrar
Credentials in the UI, follow these steps:
Select DNS Management / Credentials from the sidebar.
Click Add DNSControl Credential.
Enter a
Nameand theSettingsfor the provider.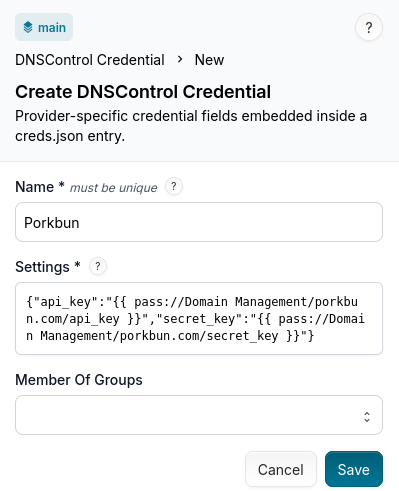
Note the JSON attribute values used here:
{
  "api_key": "{{ pass://Domain Management/porkbun.com/api_key }}",
  "secret_key": "{{ pass://Domain Management/porkbun.com/secret_key }}"
}
The pass:// reference pattern is part of the
Proton Pass CLI, which resolves these paths to the
corresponding stored secrets at runtime. The dnscontrol.sh script described later in the
Apply DNS Records with DNSControl section uses this mechanism to inject real credential
values into the rendered creds.json artifact before handing it to DNSControl. As a best
practice, never store passwords directly in creds.json or within the DNSControl Credential
Settings; most good password managers offer similar functionality to retrieve secrets securely.
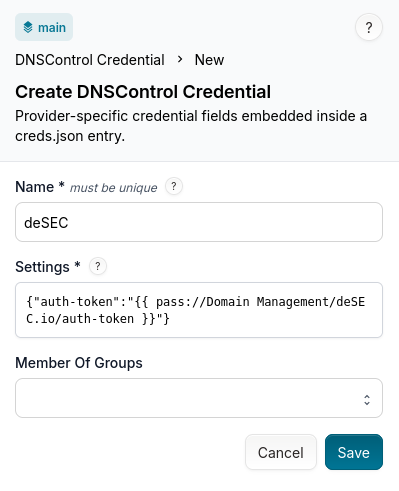
Provider Credentials#
Follow the same workflow for Provider Credentials. In my case, I use deSEC
as my DNS provider. Following the
DNSControl deSEC documentation, I add only the
auth-token entry to my DNSControl Credentials Settings:
{
  "auth-token": "{{ pass://Domain Management/deSEC.io/auth-token }}"
}
Registrar and Provider#
Now that the credentials are set up, we can move on to the Registrar and Provider configuration.
Registrar#
In the Infrahub UI, you’ll find the Registrar configuration under DNS Management / Registrars.
Add a new Registrar by clicking the Add Registrar button.
Enter a
Nameand select theCredentialsandRegistrar Typefrom the dropdowns.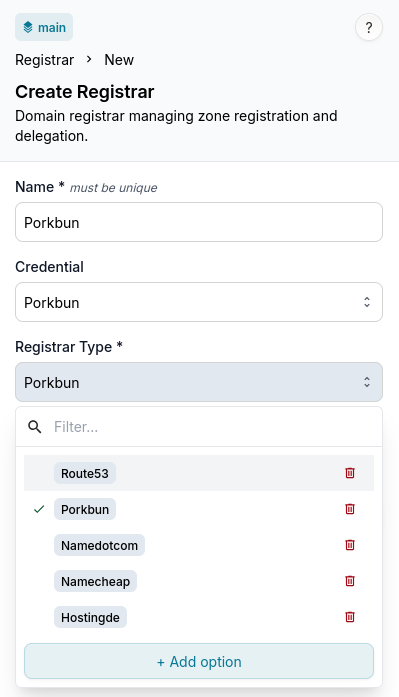
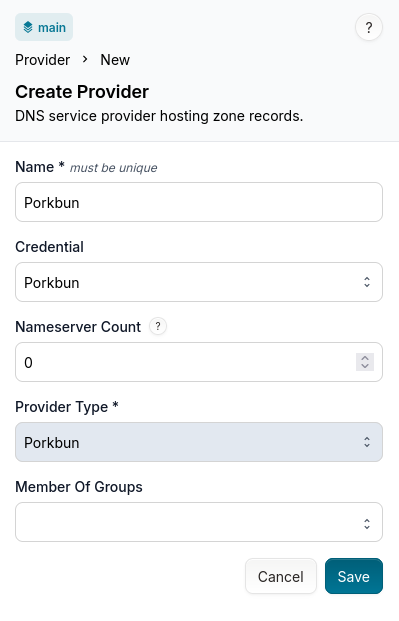
Provider#
Similarly, in the Infrahub UI you’ll find the Provider configuration under DNS Management / Providers.
Add a new Provider by clicking the Add Provider button.
Enter a
Nameand select theCredentialsandProvider Typefrom the dropdowns.
There is one additional setting here: Nameserver Count. This parameter determines how the
nameservers will be managed from this provider.
Leaving the parameter out means “fetch and use all nameservers from this provider as authoritative”. Using 0 means “do not fetch nameservers from this domain, or give them to the registrar”.
Details for this setting can be found here.
Setting it to 0 means the DNS Provider does not receive authoritative nameservers; it only
hosts the zone’s DNS records. This creates a split authority model. In my case, deSEC serves as
the primary nameserver while Porkbun acts as a synchronized backup. If you ever need to switch
providers (e.g. deSEC has an outage or you migrate away), all your records already exist on
Porkbun; you just update the nameserver delegation at the registrar with no manual record
migration.
Zones#
We are now ready to add our first DNS Zone to Infrahub.
In the Infrahub UI, you’ll find the Zone configuration under DNS Management / Zones.
Add a new Zone by clicking the Add Zone button.
Enter a
Nameand select theRegistrarand one or moreProvidersfor the zone.In addition — and this is crucial — you must also add the
DNS Zonesgroup.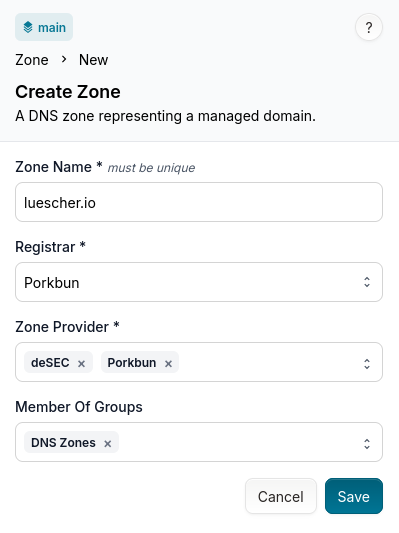
DNS Zones group to your zone configuration.
Without it, transformations will not be applied and no artifacts will be generated. In Infrahub,
Transformations
are generic pieces of logic that process data and produce output. They become targeted to
specific objects through artifact definitions and generators, which combine a transformation
with a group of targets. That’s why the DNS Zones group is required.Records#
The final missing piece for our configuration is the actual DNS records.
You can add records in the Infrahub UI under DNS Management / Records.
Add a new Record by clicking the Add DNS Record button.
Select a DNS record type from the dropdown.
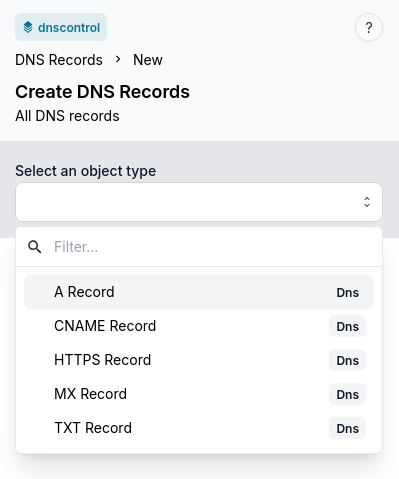
Fill in the required fields for the selected record type.
Example for a
CNAMErecord: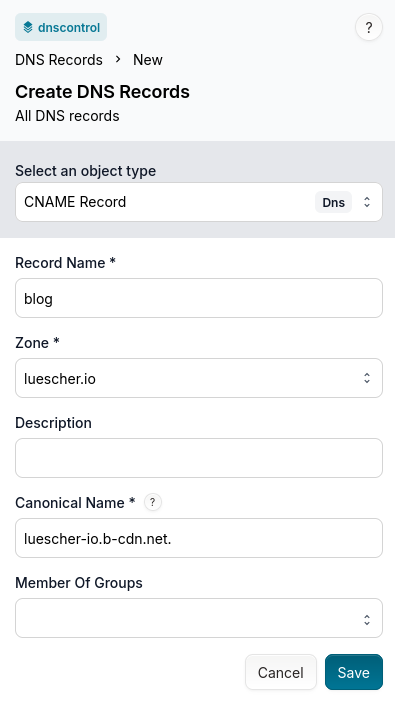
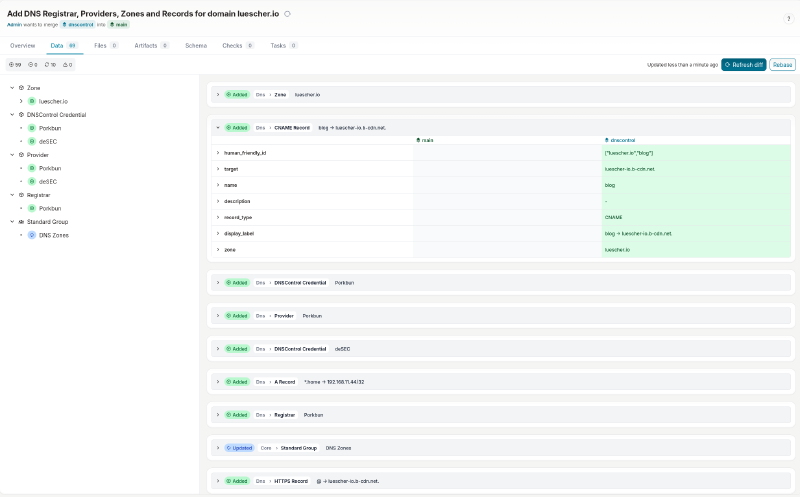
Once you’ve added all the records, you end up with an overview like this:

Propose Changes#
In Infrahub, Proposed Changes are a structured workflow mechanism that enables teams to review, discuss, and merge changes in a controlled and collaborative manner. They serve as the primary method for implementing infrastructure changes safely while maintaining proper oversight and governance.
Since we made our changes in the dnscontrol branch, we can now propose a change to merge them
into the main branch.
In the Infrahub UI, navigate to Proposed Changes and click New Proposed Change. Like any merge request, give it a meaningful title and optionally add a description.
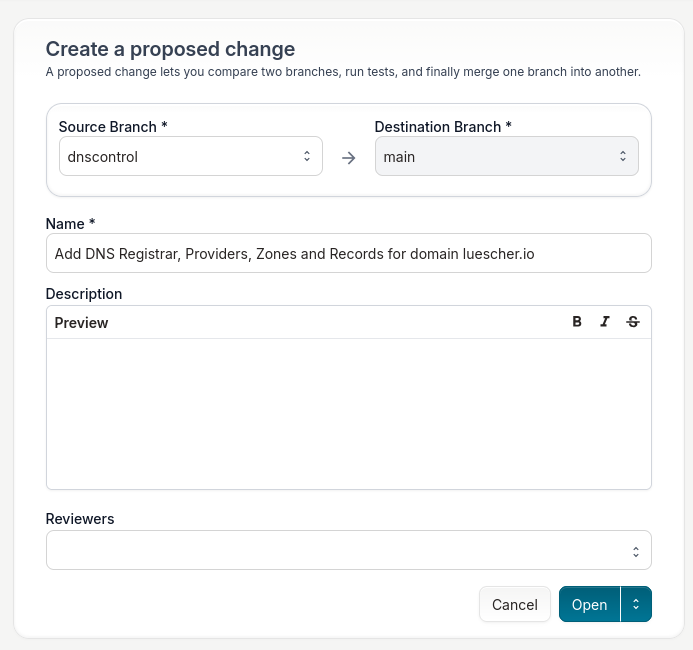
Once the proposed change is created, you can review it, discuss it with your team, and merge it
into the main branch when ready.
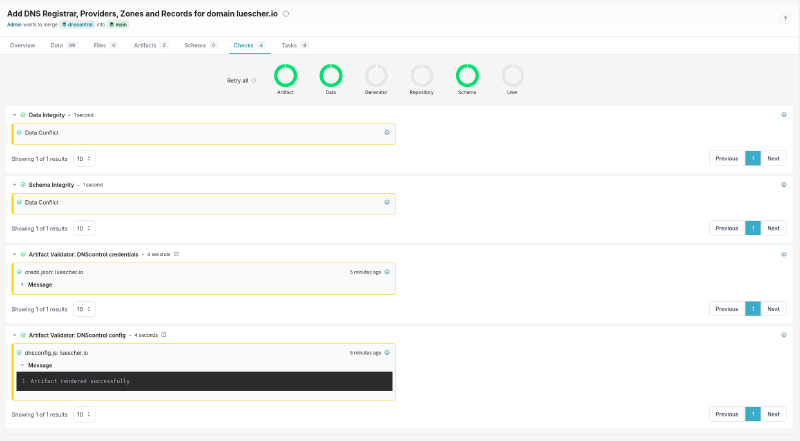
The proposed change will also trigger validation checks. For example, you’ll know beforehand whether the proposed change renders artifacts correctly.
Artifacts#
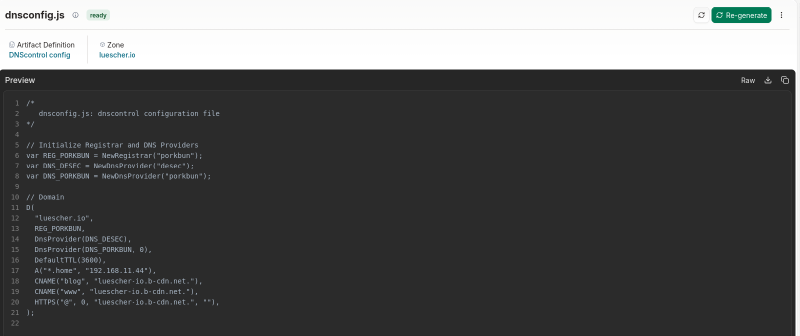
Now that the proposed change is merged, you can see the rendered artifacts in the Infrahub UI.
Go to DNS Management / Zones and select your zone. Under the Artifacts tab, you’ll see
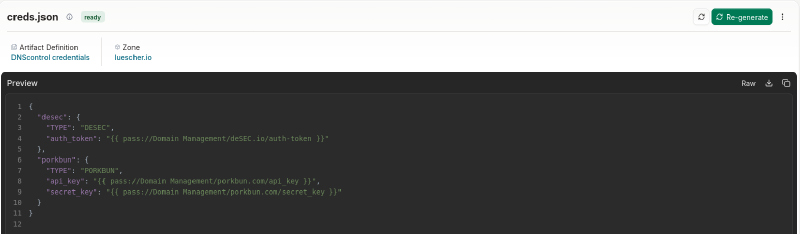
the rendered DNSControl artifacts: creds.json and dnscontrol.js.

Click on any artifact to view its contents.
Apply DNS Records with DNSControl#
Now that you have the rendered artifacts, you can use DNSControl to apply them.
The infrahub-dnscontrol Git
repository includes an example
dnscontrol.sh
script as a starting point.
As mentioned earlier, I use Proton Pass to store my credentials. The script downloads the
artifacts from Infrahub, injects the credentials from Proton Pass into creds.json, and then
uses DNSControl to apply the DNS records.
DNSControl’s preview command performs a dry run, showing a diff of what records would be
created, updated, or deleted — similar to terraform plan. No changes are made to your DNS
provider.
To preview your changes, run:
mise run dnscontrol luescher.io previewOr without mise, run the script directly:
./.mise-tasks/dnscontrol.sh luescher.io preview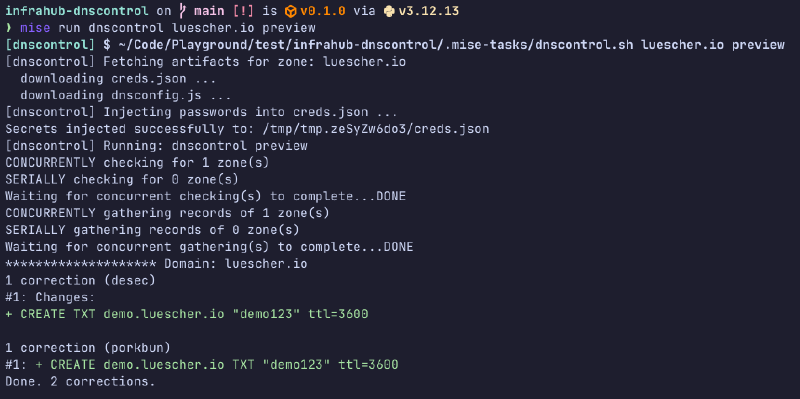
Once the preview looks correct, push applies the changes to your DNS provider.
When you’re ready to push, use:
mise run dnscontrol luescher.io pushOr without mise:
./.mise-tasks/dnscontrol.sh luescher.io push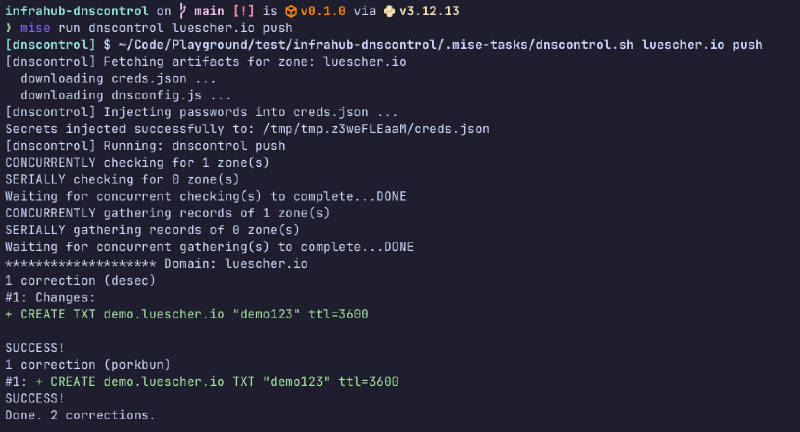
Conclusion#
This setup combines Infrahub’s graph-based infrastructure management with DNSControl’s multi-provider deployment capabilities, giving you a single source of truth for all DNS configuration. By storing registrar, provider, zone, and record data in Infrahub, transforming it through Jinja2 templates, and applying changes via DNSControl, you achieve fully declarative DNS management with built-in peer review, validation, and audit trails.
Some advantages of this approach include:
- GitOps-style workflows with proposed changes for safe collaboration
- Secure credential handling through password manager integration (Proton Pass)
- Multi-provider support without duplicating configuration across platforms
- Validation before push catching errors early in the process
- Backup strategies easily implemented with secondary providers
Future improvements could include automated workflows in CI/CD pipelines, triggered via webhook.
The infrahub-dnscontrol repository contains everything needed to get started. Feel free to open issues, feature requests, or fork it, adapt the schema to your needs, and extend the transformations.